


*A Cap with Straps and Flaps


Lesson Plan
Target Words:
- cap
- lap
- nap
- snap
- flap
- strap
Materials:
- Scraps of paper or cloth
- Scissors
- Make a Cap target text*
- Paper cap*
- Paper straps, flaps, and snaps*
- Tape, glue, paper clips, or stapler (optional)
*Items and examples included below.
State the Objective
Tell the children that they will add flaps, straps, and snaps to a paper cap while they learn about -ap words, such as cap, snap, flap, and strap.
Literacy Activities
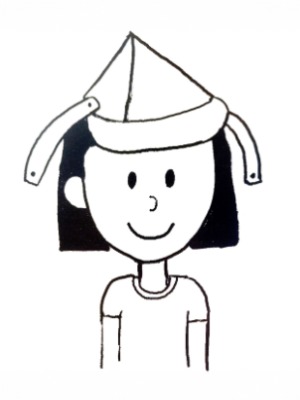
Make a paper cap
- Let the children help make a cap out of scraps of paper (see charts and example images below).
-
If using a stapler, point out how it makes a “snap” sound as you attach a flap, strap, or snap.
Teacher Does Teacher Says Cut a slit into the center of a round or oval piece of paper. I made a flap for a cap with a scrap of paper! Overlap the flap and secure it with staples, paper clips, glue, or tape. Snap! I can make a cap from a scrap. Attach the flaps (see below). I added a flap to the cap. I put another flap on the cap. Snap! Attach straps (see below). Put a strap on the flap of the cap.
Put a strap on the other flap of the cap. Snap!Attach paper snaps (see below). Put a snap on a strap. Put a snap on the other strap. Snap! Hold up the cap. A cap! It has a flap, a strap, and a snap. And it has another flap, strap, and snap. Put the cap on your lap and pretend to take a nap. I have a cap! I will put the cap on my lap and take a nap.
Make a cap by folding a flap
- Let the children help make a simple cap by folding a scrap of paper (see chart and example images below).
-
Snap your fingers and say “snap” as you make the cap and add snaps.
Teacher Does Teacher Says Cut a slit into the center of a round or oval piece of paper and overlap the edges to make a cone-shaped cap. A scrap of paper! I made a flap.
And I made a cap! Snap!Cut two small slits a finger’s width apart where the cap’s edges overlap. Cut through both layers of paper. I cut a little flap in the cap. Snap! Fold the flaps between the slits together so the cap holds its shape. I fold under the little flap to make the cap. Snap! Draw snaps on the cap. We have snaps on the cap. Snap! Hold up the cap to show the snaps. A cap! It has snaps. Put the cap on your lap and pretend to take a nap. I have a cap! I will put the cap on my lap and take a nap.
Read Make a Cap
- Display the Make a Cap target text (see below).
- Read the text with the children, emphasizing the -ap words.
- Help the children find and read words that end in ap.
Write on a cap
- Display a list of -ap words (e.g., snap, cap, flap, nap, strap, lap, map, tap).
- Read the list of words with the children.
-
Help the children write the words lap, map, tap, and cap on a cap.
SEEL Target Texts
Make a Cap
Snap! A flap is on the cap!
Snap! Another flap is on the cap.
Snap! A strap is on the flap!
Snap! Put a strap on the cap.
Snap! A snap is on the strap!
Snap! Another snap is on the strap.
A cap!
I can put the cap on my lap and take a nap.
Standards
SEEL lessons align with Common Core Standards. Please see the standards page for the code(s) associated with this lesson.
http://education.byu.edu/seel/library/

1498436
*A Cap with Straps and Flaps