SUBJECTS
GRADE
Show Results
Navajo Weaving: Warp and Weft
Lesson Summary
- Watch a video about a contemporary Navajo Weaver.
- Learn about Navajo culture, values, and history.
- Create a weaving on a loom or by using paper.
Lesson Plan and Procedure
Lesson Key Facts
- Grade(s): 2, 3, 4, 5, 6
- Subject(s): English Language Arts, Social Studies, Visual Arts, Native American, Tribe Approved
- Duration of lesson: 3 sessions, 50 minutes each
- Author(s): Rachel Gonthier, Brenda Beyal, Adalynn Gaston
 Download
The Navajo Nation’s Department of Diné Education selected this lesson content in answer to the question, “What would you like the students of Utah to know about you?” The Department of Diné Education is the education arm of the Navajo Nation. Brenda Whitehorse, the Heritage Language Director for the San Juan School District, was selected to help craft the lesson to provide expertise, accuracy, and authenticity. It was reviewed in depth by the Navajo Nation Department of Diné Education’s Office of Diné School Improvement and Office of Standards, Curriculum, and Assessment. The lesson received approval for publication with the tribal seal by the 2022 Navajo Nation Board of Education which approval was signed by the Navajo Nation President, Buu Nygren.
Before teaching this lesson, please explain to your students that there are many Native tribes in the United States and that this lesson specifically focuses on the Navajo Nation and does not represent other Native American groups. We hope other Native tribes will respect the Navajo Nation's choice to share this aspect of their culture.
Prior to teaching this lesson, read the word document titled Navajo Rug Weaving Background Information. It gives an excellent overview of Navajo weaving and its significance to Navajo cultural ways.
We will use the words Navajo and Diné interchangeably. Navajo is the common name but members of the tribe continue to call themselves Diné pronounced, Dineh. This link provides excellent sound pronunciation as well as succinct information about the two words.
Day 1: Navajo Core Beliefs, Values, Historical Experiences and Cultural Identifiers
Michele Reyes (10 minutes)
Watch Weaving As a Way of Remembering - Michele Reyes, Navajo Weaver and stop at 4:11. Open up a discussion about what the students learned from Michele using some of the questions below.
- Who taught Michele how to weave? What age was she?
- What did she realize about anything “beautiful and worthwhile”?
- How does Michele weave?
- What life lesson did she learn about setting up a loom?
- What words would you use to describe Michele?
Teacher: The Diné (Dineh), whose common name is the Navajo, is the second largest tribal nation in the United States. The Navajo tradition of weaving rugs is recognized today as one of the finest textiles accomplishments of the nineteenth century. Many like Michele Reyes continue to weave to carry on the tradition.
Warp and Weft (5 minutes)
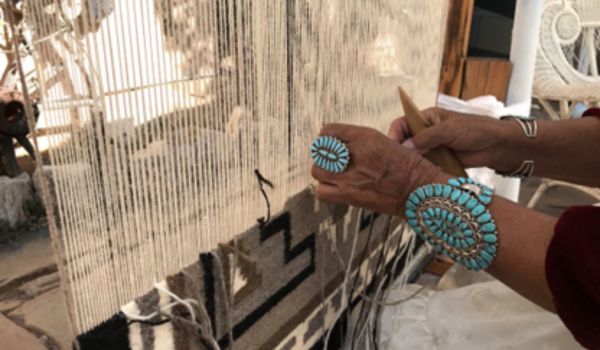
Show an image of a rug. Explain that the looms on which rugs are woven are free-standing and usually made by the man of the family. Each of the instruments used in weaving is made by hand and there are many steps in preparing the wool before the weaving begins. If time permits, watch a short video on how a weaver prepares the wool to be woven.
Teacher: Once the wool is ready, the warp which is the foundation of the rug is constructed. The warp threads run vertical on the loom and must be strong enough to support the weft threads that will be woven through them. The warp threads must also supply resistance to the comb used to pound the weft threads in place. In other words, the warp threads are the core of the weaving. They must have the right amount of tension, strength, and stability so a beautiful textile can be created.
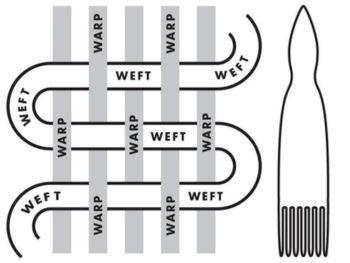
Explain that like the warp threads which are the foundation or core to weaving, the Navajo have core beliefs and values that are a foundation to their lifeways. These beliefs and values continue to be a strong foundation for the weft threads or historical experiences and cultural identifiers to be woven through. When weft threads (experiences and identifiers) are woven through the warp (core beliefs and values), a beautiful tapestry of a people’s history, values and culture is created.
Weaving the Weft Through the Warp (30 minutes)
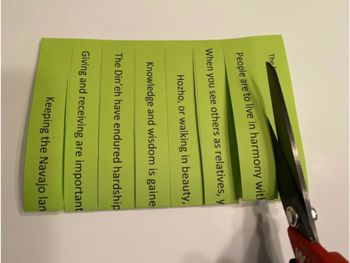
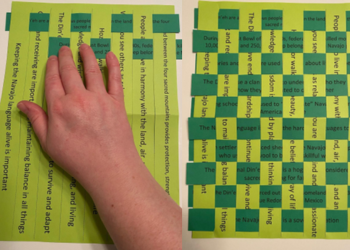
Hand out copies of the Warp with Text and Weft with Text pages to each student.
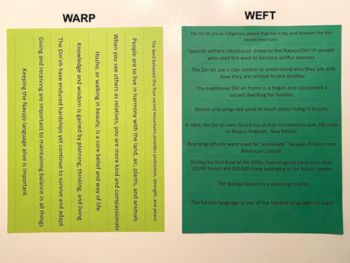
As a class, read each of the core beliefs and values written on the warp page. Have the students choose two or more of the statements they would like to learn more about. Using the Teacher Guide to Warp PDF, share about each core belief and value chosen.
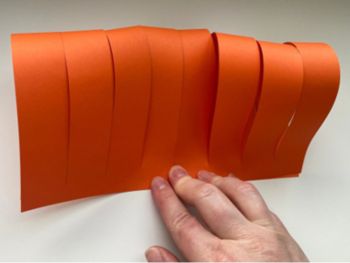
Have the students fold the warp page in half and cut on the dotted lines leaving about a quarter of an inch at the edge of the paper intact. Or, have it already cut in advance ready for each student.
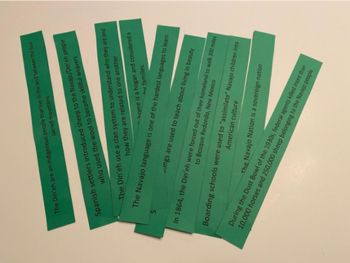
Introduce the weft strips that represent Diné historical experiences and unique culture identifiers. Before reading through each weft statement, explain:
- The core beliefs and values influenced how the Diné reacted to historical events.
- Cultural identifiers are shared practices and traditions
- Shared practices and traditions stem from core values and beliefs.
- The Navajo people maintain a cultural identity today because of their core beliefs and values.
Have students take the weft handout and cut off the first strip. Read the statement with the class and have the students weave it through their warp paper. Continue the process until all ten strips of paper are woven through.
Once again, ask the students to choose several weft statements they would like to learn more about. Use the Teacher Guide to Weft PDF to share more about each chosen strip.
If time permits, have students choose other concepts they want to learn more about.
Review (5 minutes)
Hold a review session with the students by facilitating a Think-Pair-Share focusing on several of these questions:
- What did you find interesting? Confusing?
- How do you think having these values and beliefs help the Diné in the past and present?
- How does the Navajo perspective toward the natural environment vary from other communities?
- How did the interaction between the Spanish and Diné people influence the art of weaving?
- How has availability and use of sheep and wool changed over time?
- What kinds of values and beliefs do you have that would make up your own warp threads?
- Are there any Diné teachings you would like to incorporate into your own life?
- How do Navajo people maintain cultural traditions today?
Extensions
- Have students do more research on the Navajo/Diné.
- Have each student reflect on their own core beliefs and enduring principles and create their own warp threads and then identify experiences that have been influenced by these principles.
Day 2: Learning How to Weave
Watch the rest of Weaving As a Way of Remembering - Michele Reyes, Navajo Weaver (Starting at 4:11) and reflect on the following questions:
- What is unique about the Navajo weaving process?
- Why is weaving important to Michele?
- What kinds of life lessons can we learn from her?
Teacher: Michele Reyes continues today to work to become a better weaver. She is learning more about the ways her grandmother taught her to weave. Weaving is a world art. Cultures have different ways of creating their weavings. Today we are going to create our own weavings. We will not be weaving in the authentic Navajo way. It takes a lifetime to be an expert Navajo weaver. We will be learning a simpler weaving method for beginners.
There are several ways to approach weaving in the classroom. It is ideal to have students experience weaving with yarn or some other kind of fiber material. Another option is to have students weave with paper. See the instructions below for various weaving options. Choose one or all of the options below to have your students create their own weaving.
Invite students to create their weaving by choosing colors, shapes or patterns that reflect them or something found in nature. Students can sketch out design ideas on the weaving design grids before starting.
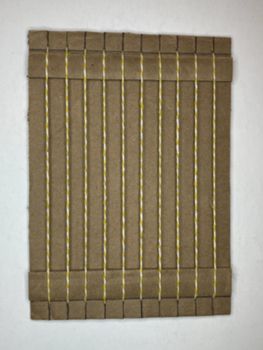
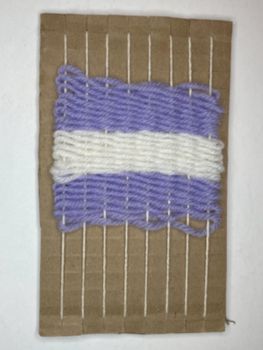
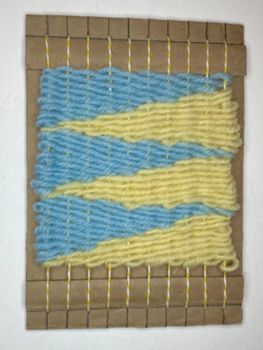
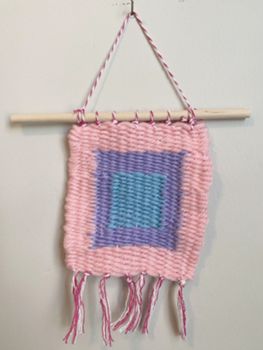
Option 1: Weaving on a Cardboard Loom
The students can create a wall hanging, bracelet, bookmark or something else out of their weaving. Invite students to sketch out their design on the Bracelet and Wall Hanging Design Grid before they begin their weaving. They can tape this down on their loom before they start their weaving process and use it as a guide as they weave on top of it.
Students can create their own loom out of cardboard or you can buy pre-made cardboard looms. You can also borrow looms and other materials found in the Navajo/Diné Culture Case from the BYU Museum of Peoples and Cultures.
Prepping the Loom
Watch this video for instructions on how to create your own loom and prepare it for weaving.
Getting Started
This video explains how to get started with basic weaving techniques. It demonstrates three different ways to transition between new pieces of yarn.
Adding Variety to Your Weaving
This video teaches how to create shapes, patterns, and variety to your weaving.
Finishing Up and Removing from the Loom
This video explains how to resolve the weaving by fastening loose ends and removing the weaving from the loom.
Extension
Inspired by the techniques from Navajo weavers, create natural dyes to dye cotton, cloth or yarn.
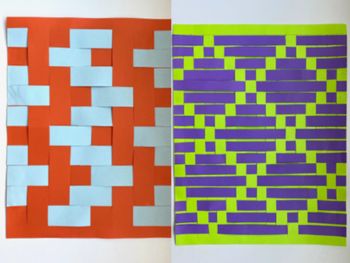
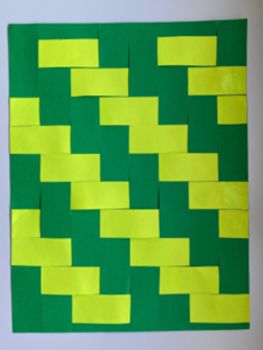
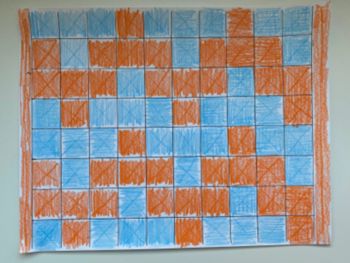
Option 2: Paper Weaving
Preparation
There are two sets of templates included for paper weaving. Choose which set best suits your students.
- Wide Weaving Template Set
- Thin Weaving Template Set
The Wide Weaving Template Set involves cutting bigger strips that create more simple designs. This is great for younger students or students that need accommodations. The Thin Weaving Template Set can be used for students that are invested in creating a more intricate design or want more of a challenge.
WIDE WEAVING THIN WEAVING
Print the Grid Design Template on regular white paper. This is for students to sketch out their weaving design.
Print warp and weft templates on different colors of cardstock or regular paper. Have enough for each student to choose one warp and one weft. Make sure to print all of the templates at 100% so that the image fills the paper as much as possible.
Getting Started
Show students some examples of finished paper weavings so that they understand what the end result can look like.
Have students choose one color from the warp copies and another from the weft copies. Hand out copies of the Design Grid PDF. Students will create a plan for their weaving by mapping out where they want their colors to go. They can use markers, crayons, or colored pencils to represent both colors of their weaving.
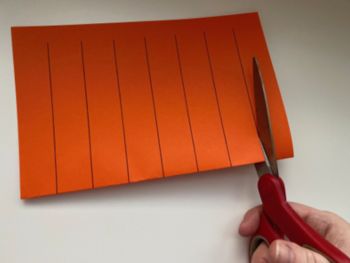
Take warp paper and fold it in half.

Cut on lines through both layers of paper.
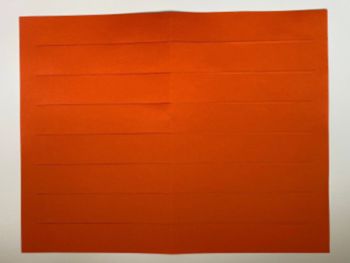
Unfold the paper.
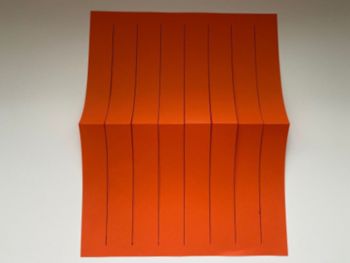
Fold the opposite way to even out the bend in the paper.
Unfold the paper again with the printed lines facing down.
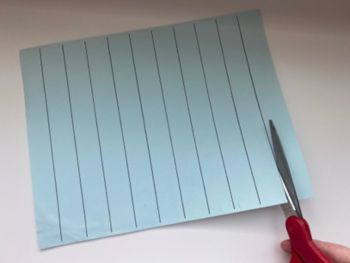
Cut weft pieces.
Weave weft strips into the warp paper.
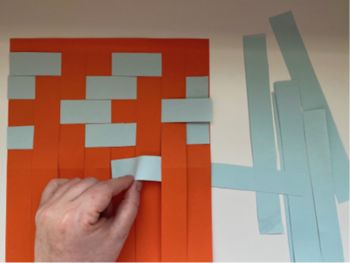
Glue down end pieces.

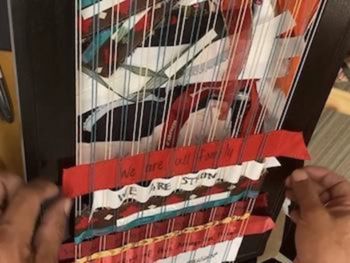
Option 3: Collaborative Weaving on a Larger Scale
Another option is to bring a large scale loom into your classroom and have the students take turns on a collaborative weaving. If you don’t have access to a loom, there are ways to make your own using an old picture frame. Watch DIY Wooden Frame Weaving Loom.
- Students can bring fabric from home that can be cut into strips. That way each student has their own unique material they can identify in the class weaving.
- Ribbons, textured yarn, or other fibers can be used as well.
- You could have a class theme to your weaving that integrates with other subjects.
- Maybe you are studying the water cycle and want to use cool colors and wavy patterns to represent water. We Are Water Protectors, a Caldecott Medal recipient, is an excellent book written by an Indigenous author to pair with your project.
- If you are teaching geology, you could have different colors of fabric to represent a variety of rock layers.
- You could also give the students a prompt and have them respond by writing on a single ribbon that they use to contribute to the weaving.
Day 3: Complete Weaving and Reflect
Allow working time to complete weaving projects. If students are weaving on a cardboard loom using yarn, they will tie up loose ends and remove it from the loom as instructed in the video. Create a space where students can hang their weavings from a dowel to display their work on a wall. If students are creating a paper weaving, they will need to glue down their strips of paper before displaying their finished art.
Give students the opportunity to share their weavings with class members and explain what thing in nature they decided to represent. What colors, shapes, or patterns did they use to represent it?
After students have acquired the skills of basic weaving, the opportunity for creative weaving projects are endless. You may want to have weaving materials available for students to use when they have extra time in the classroom.
Learning Objectives
- Create a personally satisfying weaving.
- Identify and make sense of the information shared about the Diné.
- Examine how Diné culture changed as it has interacted with other cultures over time.
- Describe ways the Navajo people maintain cultural traditions today.
- Compare the Navajo perspective to other community perspectives toward the natural environment and resources.
Utah State Board of Education Standards
This lesson can be used to meet standards in many grades and subject areas. We will highlight one grade’s standards to give an example of application.
Grade 3 Elementary Library Media
- Strand 7 Engaging with and extracting information.
- Standard 1.a. Use questions to guide reading, listening, and viewing of sources while building connections between prior knowledge and new information.
- Standard 1.b. Analyze and make sense of information (e.g., identifying main ideas, supporting details, bias, point of view, misconceptions, conflicting information).
Grade 3 Social Studies
- Standard 1 Objective 3 Analyze ways cultures use, maintain, and preserve the physical environment.
- Standard 1 Objective 3.a Identify ways people use the physical environment (e.g. agriculture, recreation, energy, industry).
- Standard 1 Objective 3.b Compare changes in the availability and use of natural resources over time.
- Standard 1 Objective 3.d Compare perspectives of various communities toward the natural environment.
- Standard 2 Objective 1.e Examine Changes in communities that can or have occurred when two or more cultures interact.
- Standard 2 Objective 2 Explain how selected indigenous cultures of the Americas have changed over time.
- Standard 2 Objective 2.a Describe and compare early indigenous people of the Americas (e.g. Eastern Woodlands, Plains, Great Basin, Southwestern, Arctic, Incan, Aztec, Mayan).
- Standard 2 Objective 2.b Analyze how these cultures changed with the arrival of people from Europe, and how the cultures of the Europeans changed.
- Standard 2 Objective 2.c Identify how indigenous people maintain cultural traditions today.
Grade 3 Visual Arts
- Standard 3.V.CR.2: Create a personally satisfying artwork using a variety of artistic processes and materials.
- Standard 3.V.P.3: Identify and explain how and where different cultures record and illustrate stories and history of life through art.
- Standard 3.V.R.1: Contemplate about the processes an artist uses to create a work of art, and determine messages communicated by an image.
Diné Standards
This lesson can be used to meet many Diné standards. The following are examples of application.
4th-6th Diné Character Building Standards
- Standard: K’ é hwiinidzin dóó ádáhozdílzin bee hadínísht’ée dooleełígíí bóhwiideesh’ááł.
I will develop and apply critical thinking to establish relationships with the environment.- Concept 2- Ádáhozdílzin.
I will maintain the sacredness of self-identity.- PO 1. Íínísts’ ą́ ą’go binahjį’ bínashidi’neeztą́ ’ígíí choosh’į́į dooleeł. I will listen to and apply Diné teachings.
- PO 2. Hódzą’go íínánígíí bee nitséskeesgo naasháa dooleeł. I will develop wise things in my personal life.
- Concept 2- Ádáhozdílzin.
4th-6th Diné Culture Standards
- Standard: K’é dóó nitsáhákees dóó nahat’á náásgóó iiná bee siih hasingo ádoolnííł.
I will develop an understanding of Diné way of life.- Concept 1: Nitsáhá kees
Shintsáhákees shił nilį́į go bee ádaa ákonisdzin dool eeł.
I will acknowledge and value my thoughts and personality.- PO 1: Diné be’é’ooĺįįł bóhoosh’aahgo binahjį’ ádił nishdlį́į dooleeł. I will develop my cultural knowledge to build self worth.
- PO 3: Nitł ałtaas’éi baa ákonisin dóó baa hashne’ dooleeł. I will explain the significance of my cultural possessions
- Concept 1: Nitsáhá kees
4th-6th Diné History Standards
- Standard: Diné bibee’é’ool’įįł dóó ádahóót’įįdígíí shił nilį́įgo ádídíínísht’i’ dooleeł. I will understand historical/factual events, people and symbols that influence my family.
- Concept 3: PO 3: Diné daasnáá dóó ch’ééná yii’ tádookai y ígíí shił bééhóz in doo leeł.
I will identify the captivity and the hardship that affected Diné people. - Concept 4: Nihina’nitin,nihe’éool’įįł, dóó nihizaad nidaasya’ígíí náásgóó yilyéłígíí baa ákonisin dooleeł.
I will understand the integrity of my culture, language, and values that are protected and maintained by Dine.- PO 2: Shik’éí dinéhí nihe’é’ool’įįł yínida’niłtinígíí shił bééhózin dooleeł.
I will identify the teachings of Dine culture and history.
- PO 2: Shik’éí dinéhí nihe’é’ool’įįł yínida’niłtinígíí shił bééhózin dooleeł.
- Concept 3: PO 3: Diné daasnáá dóó ch’ééná yii’ tádookai y ígíí shił bééhóz in doo leeł.
Equipment and Materials Needed
- Navajo Rug Weaving Background Information PDF
- Michelle Reyes Video
- Warp with Text PDF
- Weft with Text PDF
- Colorful printer paper or cardstock
- Teacher Guide to Warp PDF
- Teacher Guide to Weft PDF
- Jenna Woods Video
- Slide presentation
- Scissors
- Glue
Cardboard Weaving
- Cardboard
- Ruler
- Pencil
- Scissors
- String
- Tape
- Yarn
- Yarn needle or popsicle stick
- Wooden dowel or branch (optional)
Collaborative Weaving on a Larger Scale
- Large loom
- Strips of fabric or ribbon
Paper Weaving Project
- Wide Weaving Template Set
- Thin Weaving Template Set
- Colored pencils, markers, or crayons
- Colorful printer paper or cardstock
- Scissors
- Glue
Additional Resources
This lesson was created thanks to a grant from the National Endowment for the Arts and the Utah Division of Arts & Museums.
- A brief introduction to the Navajo/Diné people http://www.bigorrin.org/navajo_kids.htm
https://media.sjsd.org/collections/clan-materials
Nita Nez - Navajo Rug Weaver - Living History Project https://www.youtube.com/watch?v=La-y8p4GGKk
- https://search.proquest.com/openview/01a31941c3425a4f9658c8f44bfcc7 a2/1?pq-origsite=gscholar&cbl=18750&diss=y This is a women’s dissertation where she shares wisdom from ten Navajo weavers.
Image References
Image 1: https://ccsearch.creativecommons.org/photos/45b3b747-3473-4e67-a2cf-cf7bfd69a368
Images 2-4: Rachel Gonthier
Images 5-6: Curtis Soderborg
Images 7-26: Rachel Gonthier
© Brigham Young University and the Navajo Nation
www.education.byu.edu/arts/lessons