SUBJECTS
GRADE
Show Results
Coyote Steals Fire
Lesson Summary
- Learn about the history and culture of the Northwestern Shoshone people.
- Paint a watercolor landscape of an environment with Utah wildlife.
Lesson Plan and Procedure
Lesson Key Facts
- Grade(s): 3, 4, 5
- Subject(s): English Language Arts, Science, Social Studies, Visual Arts, Native American, Tribe Approved
- Duration of lesson: Four or Five sessions, 45 minutes each
- Author(s): Patty Timbimboo-Madsen and Rachel Gonthier
 Download
The Northwestern Band of the Shoshone Nation selected this lesson content in answer to the question, “What would you like the students of Utah to know about you?” Patty Timbimboo-Madsen, the NWBSN History and Culture Specialist, represented the Northwestern Band of the Shoshone Nation in crafting the lesson to provide expertise, accuracy, and authenticity.
Before teaching this lesson, please explain to your students that there are many Native tribes in the United States and that this lesson specifically focuses on the Northwestern Band of the Shoshone Nation and does not represent other Native American groups. We hope that other Native tribes will respect the Northwestern Band of the Shoshone Nation's choice to share this aspect of their culture.
This lesson is meant to be taught as a series of smaller lessons. It is best when spread out over the course of a week.
Helpful Background Knowledge for Students
- Students should have some background knowledge of white settlement in Utah and the effects it had on Native Americans that resided in the area.
- Students should be familiar with chronology, identification of problems and solutions, as well as cause and effect in relation to reading text.
- Students should have a general understanding of the physical characteristics of Utah's wetlands, forests, and deserts.
Day 1: Northwestern Shoshone
The name Shoshone originated with the expression So-so-goi, meaning "those who travel on foot." Before white settlement, the northwestern Shoshone were hunters and gatherers that traveled large stretches of land by foot, moving from season to season in order to utilize the resources of the land. They inhabited areas that are now recognized as northern Utah and Nevada, southern Idaho, and western Wyoming. Before European contact, the northwestern Shoshone identified with a larger group of people known as the Newe, or Neme ("the People"). The Paiute, Bannock, and Ute peoples were also included in this group. This larger social organization disintegrated when European influence arrived, resulting in divided groups of more formal tribal identities that are recognized today.
The northwestern Shoshone were and continue to be very knowledgeable of and sensitive to the natural environment surrounding them. They were aware of where plants grew in different locations, when those plants were in season, and how to use them for a variety of purposes. They were also very skilled at fishing and hunting. Along with hunting and gathering foods, they had other traditional activities for each season. Some activities included dancing, foot racing, and storytelling. The northwestern Shoshone have adapted to modern-day lifestyles and changes, but they still hold to their culture and continue to pass on knowledge and traditions to their children.
Talk to students about traditions and how they reflect culture. Assign students a specific season. (You can do this by the students' birthdays.) Ask students to think about a tradition or activity that they do every spring, fall, etc. It can be something that happens at school or something that they do at home with their families. Give students time to share with a partner about the tradition or activity they thought of. As a class, talk about how these activities and traditions reflect on our culture.
Explain that in the oral tradition, it was customary for the northwestern Shoshone to tell stories during the winter. In keeping with this tradition, if possible, teach this lesson in the winter. Storytelling is a way for young children to learn about their history and culture. Tell students that you will be reading one of the stories that is told from generation to generation among the Shoshone people.
Read the book Coyote Steals Fire by the northwestern band of the Shoshone Nation. 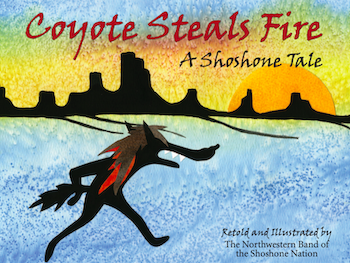
Discuss the following questions with the students:
- What kinds of traditions, activities, or customs did you pick up on in the story?
- Why do you think this story is shared among the Shoshone people?
- Can you summarize the chronology of events in the story?
- What was the initial problem in the story? (Coyote and the other animals were cold.)
- What was the coyote's solution to the problem?
- Identify the cause and effect in the story.
Utah Environments and Wildlife
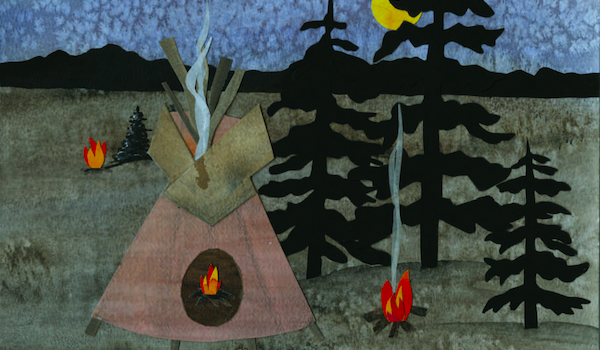
Teacher: What are some of the different landscape environments that you saw in the pictures that might be found in Utah? (E.g., deserts, forests, wetlands.) Notice how the beginning of the story takes place in some kind of wetland. Grandmother's tale begins in a forest and moves to the desert. She says, "They watched the landscape change from pine to piñon, mountain to desert."
Explain that pine and piñon are types of trees found in Utah. Pine trees usually grow in the mountains and piñon trees usually grow in the desert. Take the time to go over some of the wildlife in different areas of Utah. Show the list of wildlife with some visual examples. Ask students if they saw any of those particular plants or animals in the book illustrations.
See the "Utah Wildlife" PDF for a list of plants and animals found in different Utah environments.
The following links can be helpful for finding images and information about Utah wildlife:
https://extension.usu.edu/utahmasternaturalist/resources/course-materials
https://wildlife.utah.gov/discover
Extension:
Teach students about the different ways the northwestern Shoshone used plants that were native to Utah. The Mendon Native Plant Garden provides a great resource that includes the Shoshone names of the plants and descriptions of how the plants were used.
Day 2: Watercolor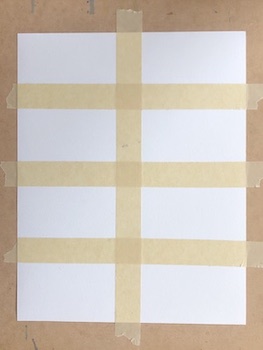
Preparation Needed:
Have a PowerPoint presentation ready with examples of texture. Have drawing boards, masking tape, watercolor paints, water cups, paper towels, and watercolor paper distributed. Watercolor paints do work very well when painted on regular paper. Watercolor paper is worth the investment if you can buy it for your students. There are some heavyweight drawing papers that work well with watercolor paints, which are a good alternative. Sax 80-lb sulphite drawing paper works great with watercolor paint and can be found here. This comes with 500 sheets that can be cut in half so it stretches for a long time and can be used for a variety of projects.
Explain to students that they will be creating their own artwork of a Utah desert, forest, or wetland. They will need to include at least one plant and one animal from that environment. Introduce the concept of texture to students before painting.
Teacher: Texture is the way something feels or the way it appears to feel. Feel the texture of your clothing. Is it soft or scratchy? Now feel your hair, your desk, or the carpet. How are these textures different from each other? These are all examples of textures you can feel in real life. Some artists mimic these kinds of textures through their sculptures, and other artists create the illusion of texture through work such as drawings, paintings, or photographs. Let's look at some visual examples of texture.
Show PowerPoint presentation with texture images.
Consider showing this video to your students to teach them about texture.
Teacher: Now let's go through the story again, but this time let's look at the pictures and notice the different textures found in the artwork. How do you think those textures were made? Today I will show you some watercolor techniques that this artist used to create some of the textures you saw in the illustrations. You will have the opportunity to explore these painting techniques on your own.
Have students divide a piece of watercolor paper into eight sections. It is ideal to have the paper taped on some kind of drawing board or cardboard if it's available. Taping the edges helps the paper stay flat and prevents the edges from curling up and causing the paint to move around or puddle in certain areas. It is better to tape the paper to a board, instead of a desk, because it allows you to pick up the paper and move the paint around when needed.
Here are a few watercolor basics to discuss with beginning painters:
- Use water to activate the colors or "wake them up."
- The more water you use, the lighter the colors become. Minimal water keeps the colors more vibrant.
- Most watercolor paints don't include the color white. In order to get white on your paper, you have to leave parts of it blank.
- Use the paper towel to pat out excess water on your brush.
- Move the paintbrush in gentle strokes. Don't smash the bristles in all directions.
- Wash off the brush before dipping in a new color. Otherwise you will make the other colors dirty.
- Don't overwork the same spot on your paper. If you brush over it too many times, it will tear away at the paper.
- When cleaning brushes, shape the bristles straight and make sure the brush dries on its side or upright in a cup. Never leave the bristles to dry facing down in a cup.


Guide students through the following techniques:
Wet on wet (wet paint on wet paper): Use a wet paintbrush to coat the paper evenly with water. Make sure the paper doesn't get overly wet; otherwise, the paper will buckle. Paint with watercolor on top of the wet surface.
Dry on wet (dry paint on wet paper): Use a wet paintbrush to coat the paper evenly with water. Apply paint to paintbrush with minimal amounts of water. You can lightly pat the brush on a paper towel if the paint is too wet. Apply the dry paint on wet paper.
Flat wash (wet paint on dry paper): Spread wet paint evenly across the surface to create a flat area of color.
Dry brush (dry paint on dry paper): Use minimal amounts of water to activate the paint. You can lightly pat the brush on a paper towel if the paint is too wet. Paint on dry paper.
Salt (table salt sprinkled on wet paint): Make a flat wash and sprinkle salt on top. If this doesn't work the first time, experiment by increasing or decreasing the wetness of the paint to see which one works best.
Lifting/blotting (lifting off paint with a paper towel): This works best when the paper is still wet. Use a paper towel to lift paint away from the paper.
Splatter (using a paintbrush or toothbrush with wet paint and flicking the bristles): This can be a little messy, but the kids love it!
Graded wash (light to dark gradient): Use increased amounts of water to dilute a color into a gradient. Side-to-side strokes work the best.
Look at the book illustrations again as a class.
Teacher: Now that you are experienced with watercolor painting, let's take a look at some of the illustrations again and see if you can identify some of the techniques that the artist used.
Day 3: Creating a Landscape
Remind students that they will be creating a landscape painting similar to the illustrations in Coyote Steals Fire. 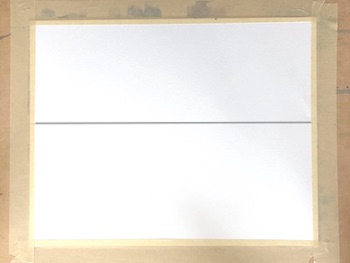 They will need to decide if their painting will be of a desert, forest, or wetland.
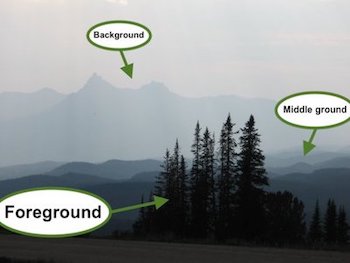
Teacher: A landscape is a picture of outside scenery. Most landscapes have a visible horizon line. A horizon line is at eye level and can usually be seen where the land or water meets the sky.
Point out some examples of horizon lines in the book illustrations. Pass out watercolor paper. Tape the edges of the watercolor paper onto a drawing board or other hard surface. Have students draw a horizon line lightly with their pencil in the middle of the paper.

Once they have the horizon line, they are ready to paint the sky. The best technique for painting sky is a wet on wet or flat wash. Make sure the students stroke side to side horizontally. They can paint a variety of colors in the sky, but warn them not to blend the colors too much, or else it will make the colors muddy. If the students want to add stars or grainy textures in the sky, they can use the salt while the paint is still wet. They can also use a paper towel to lift off paint if they want to make clouds in their sky. Give students some scratch paper, and encourage them to practice and experiment with their sky texture before painting above the horizon line.

When the sky is finished, paint the land below the horizon line. The students need to decide what colors and textures would best fit their environment. Dry brush could be good for grass. Salt or splatter are good for sandy textures. Once again, have students practice painting on their scratch paper before painting below the horizon line.
Landscapes usually have a foreground, middle ground, and background. The foreground is the part of the landscape that is closest to you in the picture. The objects in the foreground overlap everything else in the image. The background is the part of the picture that is farthest away. The middle ground is in between. Notice that the objects that are closest to us are at the bottom of the paper and are much larger than the things in the middle ground and background. As your eye moves up towards the horizon line, the objects get smaller and appear farther away. Explain these concepts to your students by showing landscape examples.

The students need to decide what plants and animals they want to include in their landscape painting. Make sure they choose plants and animals that live in the environment they are painting. Instead of painting plants and animals directly in foreground, middle ground, and background, they will be cutting out scraps of paper and gluing them onto their paintings.
Take the time to have students paint patches of color and textures on scratch pieces of paper. These will be the papers that students will later use to cut out plants and animals and glue on their paintings. Have the students consider painting textures for the following things:
Background Objects
Have students think about what they would like in the background and if they will have anything directly above the horizon line. If they are painting a forest, then they might want to make the texture for mountains with trees or snow. If they are painting a dessert, they might want paint textures for rocky hills or a low mountain range.


Middle-Ground Objects
The students will also need to paint patches of color and texture for the objects in the middle ground. Rocks, plants, and animals are some things they might want to consider putting in the middle ground. Because they are in the middle ground, they don't need to be very big. The students won't need to paint paper for objects in the foreground because those will be cut out of black construction paper instead.
Day 4: Completing the Landscape
Once the scratch pieces of paper are dry, hand them back to the students, along with a piece of black construction paper. 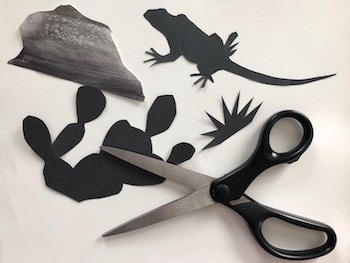 The students will draw an outline of their animals, plants, rocks, and mountains using a pencil. Explain that the black paper should be used for the objects in the foreground and that they should be relatively bigger than the objects in the middle ground and background. The black paper will create the illusion of a silhouette.
When the outlines are complete, they are ready to be cut out and glued onto the painting. Encourage students to arrange all of the shapes together before gluing them in place. The background shapes should be above the horizon line. The middle ground shapes should overlap the background and should be placed below the horizon line. The foreground shapes should overlap everything else in the image and should be placed at the bottom of the paper.

Consider having the students write a description or an artist statement when the artwork is complete. Give them the opportunity to present their work and teach the class about the plants and animals in their landscape.
Extensions
- Have the students classify the plants and animals featured in their artwork by using a simple classification system.
- Students can research adaptations and write about the physical characteristics that allow their plants and animals to survive in their environment.
- Teach the "Northwestern Shoshone Fish Song Lesson" by Emily Soderborg (see "Additional Resources" below).
Learning Objectives
- Explore cultural influence from groups found in Utah.
- Describe the overall structure in a text including chronology, cause/effect, and problem/solution.
- Create models of wetlands, forests, and deserts.
- Identify common plants and animals found in Utah forests, wetlands, and deserts.
- Explore art-making techniques and approaches.
- Compare responses to a work of art before and after working in similar media.
Utah State Board of Education Standards
This lesson can be used to meet standards in many grades and subject areas. We will highlight one grade’s standards to give an example of application.
Grade 4 Social Studies
- Standard 4.2.1: Use evidence (for example, artifacts, texts, oral traditions, geographic inquiry) to make inferences about, and explain the importance of, the geography of the land that would become Utah in the culture of one or more prehistoric or historic Native American cultures.
- Standard 4.2.3: Use primary and secondary sources to compare important aspects of the ways of life of at least two Native American tribal groups (for example, Ute, Paiute, Navajo (Diné), Shoshone, Goshute) existing existing within the land now called Utah and how those ways of life changed as settlers from Europe arrived prior to 1847.
- Standard 4.5.6: Choose one of Utah’s cultural institutions (for example Utah Symphony, The Tabernacle Choir at Temple Square, Utah Opera Company, Ballet West, Utah’s Shakespeare Festival, Utah Festival Opera), and explain its historical significance as well as the cultural benefits to Utah families and our nation.
Grade 4 English Language Arts
- Standard 4.R.10: Describe the overall structure using terms such as sequence, comparison, cause/effect, and problem/solution. (RI)
Grade 4 Science with Engineering Education (SEEd)
- Standard 4.1.1: Construct an explanation from evidence that plants and animals have internal and external structures that function to support survival, growth, behavior, and reproduction. Emphasize how structures support an organism’s survival in its environment and how internal and external structures of plants and animals vary within the same and across multiple Utah environments. Examples of structures could include thorns on a stem to prevent predation or gills on a fish to allow it to breathe underwater. (LS1.A)
Grade 4 Visual Arts
- Standard 4.V.CR.3: Explore and invent art-making techniques and approaches by utilizing and caring for materials, tools, and equipment in a manner that prevents danger to oneself and others when making art, and by documenting, describing, and representing regional constructed environments.
- Standard 4.V.R.1: Compare responses to a work of art before and after working in similar media.
Equipment and Materials Needed
- Northwestern Band of the Shoshone Nation. Coyote Steals Fire. Logan: Utah State University, University Libraries, 2005.
- Watercolor paper or heavyweight drawing paper
- Masking tape (optional)
- Cardboard or another hard surface (optional)
- Pencil
- Watercolor paints
- Paintbrushes
- Cups
- Water
- Paper towel
- Salt
- Black construction paper
- Scissors
- Glue
Additional Resources
This lesson was created thanks to a grant from the National Endowment for the Arts and the Utah Division of Arts & Museums.
- https://www.uen.org/lessonplan/view/27628
- https://wildlife.utah.gov/discover
- https://extension.usu.edu/utahmasternaturalist/courses/index
- Shoshone Language Dictionary
- Northwestern Shoshone Fish Song lesson, Pengwi bai Anoga by Emily Soderborg
- Utah Wildlife PDF
Image References
Images 1: Utah State University Press
Image 2: Northwestern Band of the Shoshone Nation
Image 3: Utah State University Press
Images 4-15: Rachel Jackson
© Brigham Young University and the Northwestern Band of the Shoshone Nation

www.education.byu.edu/arts/lessons