SUBJECTS
GRADE
Show Results
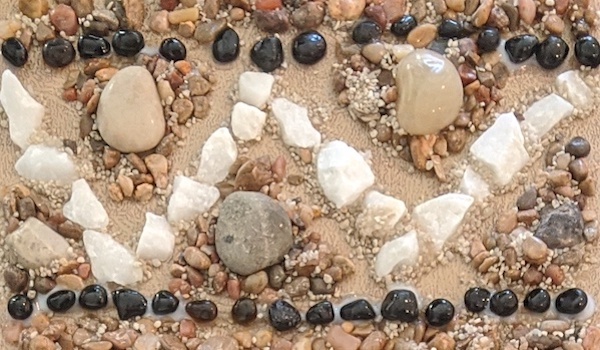
We Love Rocks!
Lesson Summary
- Explore the properties of rocks.
- Learn about elements and principles of art.
- Create 3-Dimensional rock art.
Lesson Plan and Procedure
Lesson Key Facts
- Grade(s): 2, 3, 4
- Subject(s): Math, Science, Visual Arts
- Duration of lesson: Two or three sessions, 45 minutes each
- Author(s): Elizabeth Sampson
 Download
Day One:
Explain the difference between geometric and organic lines.
Geometric lines are usually very structured and mathematical. Organic lines can be free-flowing and irregular.
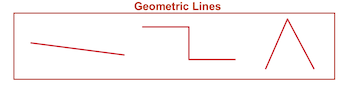
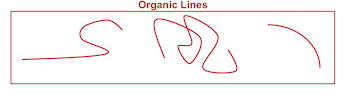
Show the following artworks as examples that include organic and geometric designs.
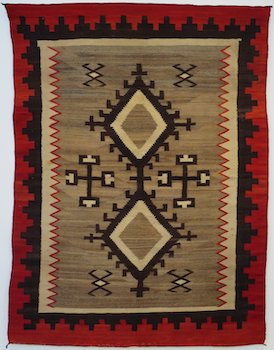

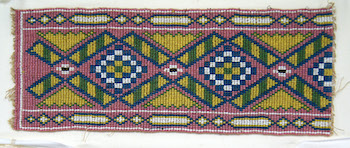
Teacher: Which pieces of art have geometric lines? Where do you see organic lines?
Activity: Soil Composition
Teacher: We are going to practice drawing geometric and organic lines while learning about soil and rocks.
On a piece of paper, or in a sketchbook, have the children divide their paper in half, then on one side draw three more lines dividing one half into four equal rectangles. Point out to students that they have used geometric lines to divide their paper. This is also a good time to review math terms and fractions.
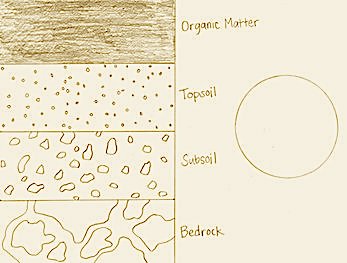 In the bottom box, have the students draw big rocks that fill the space. Explain that this is bedrock which is the bottom layer of soil containing large pieces of rock and very little water.
In the next box up, have the students draw medium size rocks that fill the space. This is subsoil. It contains broken pieces of rock.
In the next box, draw little tiny circles. This represents topsoil or the top layer of the soil. It contains sand, clay, and humus which gives nutrients to the plants.
In the top box, shade it with a side of the pencil. This represents organic matter or humus. Organic matter is decomposed plants and organisms.
Talk about the various layers of soil as you draw and discuss their different properties.
On the other “half” of the page have the students draw a circle. Choose to focus on one of the following concepts and standards and have the students write and sketch on the paper:
- Use the circle to draw the rock cycle.
- Divide the circle into thirds and sketch the three basic types of rocks: sedimentary, igneous, and metamorphic and describe their characteristics.
- Divide the circle into fourths and draw the basic kinds of soil: clay, sand, and loam. Gravel is sometimes classified as a type of soil. All soil is a combination of the four.
Day Two: Studio Time
Teacher Preparation:
- Cut mat board into small squares and rectangles (between 5 x 7 and 8 x 10). Consider getting mat board by asking for a donation from a local framing store.
- Put pebbles, gravel, and sand in separate tubs. Large basins work best to contain the mess. Smaller tubs don’t work as well. Set up enough large basin containers so the children don't have to wait long to use the sand or the gravel.
- Make sure to divide up the pebbles into at least four or five containers and place them around the room so that the children can take their time picking out pebbles without getting in the way of the children who are putting sand and gravel on their glue.
- The students will probably end up mixing the sand colors. Save some pure color, so you can put out a fresh batch as needed.
- Distribute bottles of Tacky Glue for students to share while working at their desks.
Elements and Principles of Art
Discuss how to unify art by using repeating elements of line, shape, texture and color.
- Line: Talk about different kinds of lines (straight, curvy, dotted, zig-zag, thick, thin).
- Shape: Experiment with lines to make shapes. Make organic (free form) and geometric shapes (rectangles, squares, circles). Repeat shapes to make patterns.
- Texture: Show students how to identify a variety of textures and recognize their differences.
- Color: Talk about neutral colors and choosing a variety of lights and darks.
For more information on these elements and principles of design, review the following resources:
https://www.getty.edu/education/teachers/building_lessons/elements_art.pdf
https://www.getty.edu/education/teachers/building_lessons/principles_design.pdf
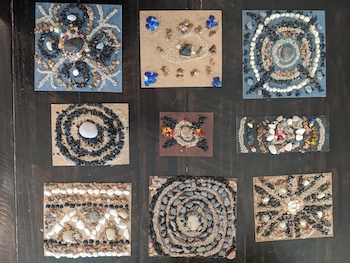
Creating 3-Dimensional Rock Art
Teacher models the following: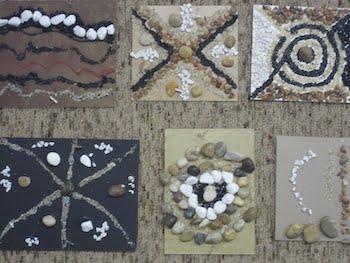
- Select a mat board and decide on a design using new knowledge of line,
shape, texture, color and other design principles. - Use glue to create lines and shapes on the mat board at your own table.
- Go to the different tubs to put rocks, sand, or gravel on the glue. Only use one color at a time! Wait in line. Only one person at a time can be at a tub putting rocks, sand or gravel on their picture.
- Add patterns and interesting designs to make a unique artwork.
- Use at least 3 different colors of rocks, gravel or sand.
- Use at least 3 different sizes of rock.
 Instruct students to pick out a piece of mat board. Have students create art using the rocks available in the room. This is messy, but fun. Remind students to put the glue on their picture at the table before they go to the different tubs to put the rocks, gravel, or sand on the glue. Check each student’s artwork as they are working and help them individually with self-assessment.
Makes suggestions to help students create artwork that applies the elements and principles of design discussed earlier in the lesson.
When students finish their artwork, have them place the mat boards on a drying rack. Once the project is dry, these can be hung on a display panel with Velcro.
Assessment
- Did you use three colors of rocks?
- Did you use three different sizes of rock?
- What shapes or lines did you use?
- What kinds of lines and shapes did you use in your artwork?
- Describe the textures in your artwork.
- How did you arrange color in your artwork?
- What are the differences in the layers of a soil profile?
- How can you identify different kinds of soils?
- Can you name the three different types of rocks and how they are made?
- How can these rocks be identified through color, texture, and strength?
Learning Objectives
- Sort rocks based on similar properties such as color and texture.
- Identify observable properties in a soil profile.
- Create a design by experimenting with and exploring a variety of rock materials.
- Repurpose rocks to create an artwork.
- Partition rectangles into two and then four equal shares and describe the shares using the words halves, half of, a fourth of, and so on.
Utah State Board of Education Standards
This lesson can be used to meet standards in many grades and subject areas. We will highlight one grade’s standards to give an example of application.
Grade 2 Science with Engineering Education (SEEd)
- Standard 2.3.1: Plan and carry out an investigation to classify different kinds of materials based on patterns in their observable properties. Examples could include sorting materials based on similar properties such as strength, color, flexibility, hardness, texture, or whether the materials are solids or liquids. (PS1.A)
Grade 2 Visual Arts
- Standard 2.V.CR.2: Experiment with various materials and tools to explore personal interest in a work of art or design.
- Standard 2.V.CR.4: Repurpose objects to make something new.
Grade 2 Math
- Standard 2.G.3: Partition circles and rectangles into two, three, or four equal shares; describe the shares using the words halves, thirds, half of, a third of, etc.; and describe the whole as two halves, three thirds, or four fourths. Recognize that equal shares of identical wholes need not have the same shape.
Equipment and Materials Needed
- Examples of Native American art, petroglyphs and other forms of rock art
- Sample artwork to show children finished product
- Pencils
- Paper or sketchbook
- Tacky Glue–school glue is too thin and will not work as well.
- Mat board in assorted colors cut into small squares and rectangles (between 5 x 7 and 8 x 10).
- Sand, gravel and pebbles in various sizes texture and colors. As an idea you could purchase natural colored river pebbles, white, black, and reddish sand, and aquarium gravel in black, white, and brown. Dollar stores sell pebbles and hardware stores sell playground sand that is much cheaper than craft sand. It also helps students make a personal connection to have the students gather pebbles and gravel from the playground in preparation for this art project.
Additional Resources
- Video Examples for Rock Art
This is a brief video of Mrs. Sampson and Mrs. Embleton teaching a 2nd grade class "Rock Art"
Image References
Image 1: Elizabeth Sampson.
Images 2, 3: Rachel Gonthier.
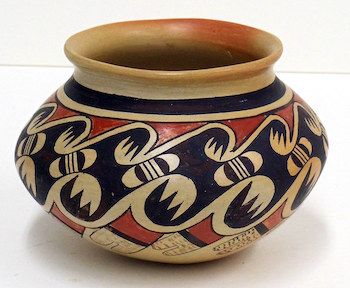
Image 4: Pot: "Hopi Tewa Pot" by Mathers Museum of World Cultures is licensed under CC BY-NC 2.0.
Image 5: Rug: https://commons.wikimedia.org/w/index.php?title=Special:Search&limit=50&offset=0&profile=default&search=navajo+rug&advancedSearch-current={}&ns0=1&ns6=1&ns12=1&ns14=1&ns100=1&ns106=1#/media/File:Navajo_blanket_or_rug,_Honolulu_Museum_of_Art,_4420.1.JPG.
Image 6: Petroglyph: https://www.flickr.com/photos/bondomania/514271224.
Image 7: Beaded Strap: https://upload.wikimedia.org/wikipedia/commons/5/59/Native_American_Loom-Woven_Beaded_Strap.jpg.
Image 8-10: Elizabeth Sampson
www.education.byu.edu/arts/lessons