SUBJECTS
GRADE
Show Results
Paiute Symbols and Logos
Lesson Summary
- Learn about signs, symbols, petroglyphs, and pictographs.
- Understand the meaning behind the logos of the five Paiute bands.
- Create a personal logo through printmaking.
Lesson Plan and Procedure
Lesson Key Facts
- Grade(s): 2, 3, 4, 5
- Subject(s): English Language Arts, Social Studies, Visual Arts, Native American, Tribe Approved
- Duration of lesson: Two sessions, 45 minutes each
- Author(s): Dorena Martineau, Shanandoah Martineau Anderson, Rachel Gonthier, Eliza Een, and Emily Soderborg
 Download
The Paiute Indian Tribe of Utah’s Tribal Council selected this lesson content in answer to the question, “What would you like the students of Utah to know about you?” Dorena Martineau, the Paiute Cultural Resource Director, and Shanandoah Martineau Anderson, a member of the Shivwits band of Paiutes that specializes in Native American universal sign language as well as petroglyphs and pictographs, represented the Paiute Indian Tribe of Utah in crafting the lesson to provide expertise, accuracy, and authenticity. The lesson was then approved by the Paiute Indian Tribe of Utah’s Tribal Council.
Before teaching this lesson, please explain to your students that there are many Indigenous tribes in the United States and that this lesson specifically focuses on the five bands of the Paiute Indian Tribe of Utah and does not represent other Native American groups. It is the hope of the Paiute Indian Tribe of Utah that other Native tribes will respect their choice to share these aspects of their history and culture.
Petroglyphs and Pictographs
Show slides 2-8 from the PowerPoint presentation to see how many signs and symbols the students can identify.
Explain that these pictures are considered ideograms. An ideogram is a symbol that is used to represent an idea, concept, word, or phrase. Instead of writing out a whole sentence using letters and words, you could communicate the same ideas by using ideograms. Ideograms can be understood even if people speak a different language, which makes them useful messages to leave behind. Ancient Egyptian hieroglyphics and Chinese characters are both examples of ideographic writing. Another example is Native American picture writing found in petroglyphs and pictographs.
Show images in slides 9 and 10. Explain the difference between petroglyphs and pictographs. (see slides for more information).
Show image of Rock Writing Panel (slide 11). Explain that some native tribes carved or painted ideograms as a way of telling stories from their lives and recording their history.
Show an image of Vandalized Rock Writing (slide 12) and address the importance of being respectful to others’ cultures and their history.
Show slides 13-18.
Teacher: These images are examples of Paiute picture writing. Today, the Paiute Indian Tribe of Utah is a federally recognized Native American tribe. The Southern Paiute language doesn’t have words that are written; however, they have used another form of documentation where pictures and symbols were etched into or painted on rocks, known by the Paiutes as “storied rocks.” These images communicate the stories, history, and other aspects of life that those who created the pictures felt were worthy of the time it took to record on rocks. Storied rocks were created by many Native American tribes across North America. Even though their spoken languages were different, the universal images on the rocks were still understandable by various tribes. Now, because the Paiute language is being lost, those who can understand the stories on the rocks are trying to share their importance with others. This set of pictures was put together by Shanandoah Martineau Anderson, a Southern Paiute, to share how the Paiute symbols can be read today.
Show slides 19-21 to provide more information about the Paiute tribe.
Logos
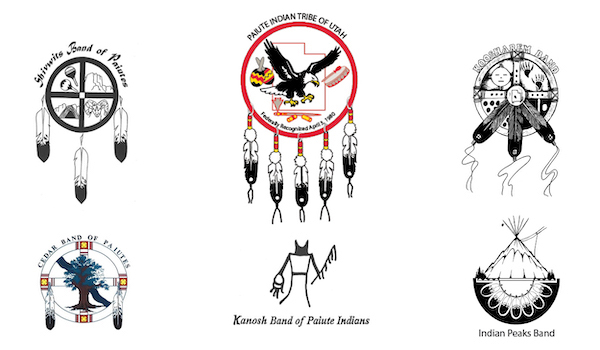
(Show slide 22.) The Paiute Indian Tribe of Utah consists of five constituent bands, meaning they combine together to create a whole. Each band has its own logo or seal that represents the things that are important to them. A logo is a symbol or ideogram that is meant to identify an organization or group.
Teacher: Oftentimes logos have a deeper meaning behind them. We’re going to take a closer look at these logos and understand what they symbolize. We’ll start by looking at the Paiute Indian Tribe of Utah logo as a class, and then we’ll break into smaller groups for the other band logos.
Show slide 23 and explain that these logos are made up of multiple ideograms that represent something significant. Read through the description with the class and demonstrate that you will be circling the ideograms that can be seen in the logo and underlining what that ideogram represents. For example, you would circle the word “eagle” in the first sentence and underline the words “Paiute deity." Finish circling and underlining the rest of the PITU logo description as a class and then divide students into five groups. Hand out copies of Paiute Band Logos and Descriptions to the groups. Each group will have a copy of one of the band logo descriptions. Give students time to read about their assigned band and identify the ideograms and their meanings. Invite each group to take turns presenting what they learned to the class using slides 24-28.

Teacher: We see logos all around us every day. Here are some common logos that you will probably recognize.
Show slides 29-33 and go over logo meanings.
Teacher: Today you will be designing your own logo. Your logo can represent yourself, your family, your class, school, or any other group that is meaningful to you. Before you start drawing your logo, let’s brainstorm some ideas.
Have students choose what they want their logo to represent. Then have them take a couple of minutes to reflect on the following questions:
- What is important to you or your group?
- If you could describe yourself or your group in three words, what would they be?
- What is something unique about you or your group?
Have students do the following:
Choose three words that they associate with themselves or their group and have them write each of those words in the middle of three separate sheets of paper. Direct students to create a word web by expanding on each word with additional words that relate (slide 35).

Organize the words into three columns (slide 36).

Cross off words that aren’t as useful in creating your logo. Then mix and match to make unexpected combinations (slide 37).

Choose the strongest combination. Sketch the combination in as many different ways and styles as possible. Try to simplify shapes and details (slide 38).

Choose your combination of styles and draw your final design in pencil (slide 39).

Printmaking
Inform students that the printmaking process will turn letters and other images backwards, into a mirror image. Students also should know that the marks that they make with their pens will eventually end up white on their print.
Drawing Transfer (optional)
- On a piece of paper, trace around foam printing plate and draw logo inside.
- Flip the paper over and shade the backside with a pencil. This will help transfer the image to the foam plate later.

- Place your logo drawing on top of the piece of foam.

- Hold the paper down so that it doesn't move around and use a ballpoint pen to carefully trace over your pencil lines. Use a medium pressure so that it creates an indentation in the plate but be careful to not press too hard or you will rip the paper or puncture your plate. Small amounts of the pencil shading on the back should transfer over so that you can see your marks better on the foam plate.

Engrave and Print
- With a pencil or ballpoint pen, draw your logo on the foam or trace over the existing lines if you have already transferred your drawing. This will make sure that there is sufficient indentation on the foam. Be careful to not poke through the foam plate.

- Use water soluble markers to color over the foam plate. Color with the lighter colors first then add darker colors last.

- Dip your sponge in water and squeeze out excess. Make sure the sponge isn’t too saturated with water. Take a blank piece of paper for printing and drag the wet sponge evenly across the paper twice so that the paper is slightly damp.

- Immediately place the foam plate face down in the center of the paper.

- Press down on the foam plate making sure not to let it shift or slide out of place. Lightly massage it and push down in different areas while keeping it in place.

- Carefully remove the foam plate from the paper without smudging the ink.

- Repeat the process to improve your prints or try a new color scheme. Residual colors from the previous print can be wiped off of the printing plate with a wet paper towel or they can be left to add layers to the next print.

If you don’t have the time or the materials to do a printmaking project in your classroom, consider having the students color in their logos with colored pencils or markers.
Reflection
Each band found it important to share the meaning of their logo. Have students write about the meaning behind their logo or give them an opportunity to talk about it with others.
Learning Objectives
- Discuss the American Flag as a symbol that reflects rights and responsibilities of United States citizens.
- Demonstrate respect for the opinions, background, and culture of the Paiute Tribe.
- Identify how the Paiute people maintain cultural traditions today.
- Identify and explain how and where the Paiute people have recorded and illustrated stories and history of life through art.
- Contemplate about the processes an artist uses to create a work of art, and determine messages communicated by an image.
- Write explanatory text to convey ideas and information about a logo design.
Utah State Board of Education Standards
This lesson can be used to meet standards in many grades and subject areas. We will highlight one grade’s standards to give an example of application.
Grade 3 Social Studies
- Standard 3.2.3: Define their own cultures or the cultures of their communities (for example, art, music, food, dance, system of writing, architecture, government to which they are regularly exposed or of which they are part).
- Strand 3: Your Rights and Responsibilities as a Community Member - Students delineate their civic rights and responsibilities as members of their community and the limits to their rights when they conflict with the rights of others.
Grade 3 Visual Arts
- Standard 3.V.P.3: Identify and explain how and where different cultures record and illustrate stories and history of life through art.
- Standard 3.V.R.1: Contemplate about the processes an artist uses to create a work of art, and determine messages communicated by an image.
Grade 3 English Language Arts
- Standard 3.W.2: Write informative/explanatory pieces to examine a topic that conveys ideas and information clearly, link ideas within categories of information using words and phrases, and provide a concluding statement.
Equipment and Materials Needed
- Lesson PowerPoint
- printed on 11x17” paper (one page per logo)
- Scratch paper
- Pencils
- Pens (optional)
- Foam plate: you can use foam from take-out containers or plates. Dollar Tree sells rectangular plates in bags of 30. You can also purchase foam plates that are made for printmaking at Dickblick.
- Paper
- Water soluble markers
- Sponges
- Water
Additional Resources
This lesson was created thanks to a grant from the National Endowment for the Arts and the Utah Division of Arts & Museums.
- Marker Printmaking Tutorial Video
- Additional Printmaking Instructions
- National Parks Service Curriculum Guide, includes links to useful resources about the Southern Paiute culture. The curriculum is geared toward grades 6-9, but could be adapted for younger students http://npshistory.com/publications/para/so-paiute-cur-guide-6-9.pdf
Image References
Images 1: Paiute Indian Tribe of Utah
Images 2-26: Rachel Gonthier
© Brigham Young University and Paiute Indian Tribe of Utah
www.education.byu.edu/arts/lessons