SUBJECTS
GRADE
Show Results
Sound: Classification and Communication
Lesson Summary
- Investigate characteristics of sound for common objects
- Classify these "found sound instruments" according to timbre
- Design a music composition that communicates an emotion
Lesson Plan and Procedure
Lesson Key Facts
- Grade(s): K, 1, 2, 3
- Subject(s): Music, Science
- Duration of lesson: Multiple sessions totaling 3 hours
- Author(s): Emily Soderborg
 Download
Note: This lesson is divided into four sessions but can be adjusted to more or less sittings depending on time constraints and pacing.
Before class starts, make a copy of the Found Sound Classification worksheet for each student. Set out household items and musical instruments around the room.
Session 1: Sound vs. Music
Teacher: There are sounds all around us. You can make a sound by clapping your hands together. What do you think causes your hands to make a clapping sound? How do your hands feel when you clap? Our voices also make sound. Put your hand on your throat. What do you feel when you talk?
Have students count to three out loud so they can feel the vibrations.
Teacher: What do you feel when you are not talking? Now put your hand on your throat when you are singing. Sing the first phrase of “Twinkle, Twinkle Little Star.” What do you feel? What do you feel when you are not singing? Do you feel a small movement? What you feel moving is called a vibration. These vibrations in your vocal cords make sound. As you talk or sing you can feel those vibrations. This also happens with musical instruments.
Show students examples of musical instruments/sound sources that have different vibrating materials (possibilities are listed): vibrating strings (guitar, rubber band guitar); vibrating membrane (hand drum, balloon drum); vibrating air (recorder, straw pan flute); vibration of the instrument itself (triangle, maracas, or most other percussion instruments that are not drums).
Teacher: Can you figure out where each instrument is vibrating?
Play each instrument again, having students use all of their senses to figure out where the vibrations are happening. For example, play the drum, and then touch the drumhead, showing how the sound stops when the vibration stops.
Teacher: Each of these instruments vibrates to make sound. How is sound different than music? What makes something music rather than just noise?
Teacher: Here is one definition of music: “Music is organized patterns of sounds and silences, created by a human composer, to be expressive.” A composer is the person who creates the music. Over the next few times together you will get the chance to be composers. But first, we need to understand the sounds around us, so we can make our best decisions as we create our own music.
Teacher: We’re going to play a game to see if you can follow me exactly as we explore characteristics of sounds. When I hold my hands out, palms up, you get to talk. When I turn them over you immediately stop. Let’s see how well you follow.
Conduct the students talking so they are really watching you before they start focusing on the different characteristics of sounds. Conduct the students as they start and stop talking a few times.
Teacher: Some sounds are high while other sounds are low. Can you make your voice sing high?
Have students watch you conduct their high singing on and off two or three times.
Teacher: How low can you sing?
Teacher: Some sounds are loud while other sounds are soft, which means quiet.
I will have one student demonstrate singing (not yelling) loudly.
Select one student to sing loudly. Have the entire class then sing as softly as they can while you conduct their sounds.
Teacher: Some sounds are short sounds. This means the time from when the sound starts to when the sound stops goes by very quickly. Listen as I show you.
Demonstrate by singing a note as briefly as you can. This might be represented in music by a 16th note.
Teacher: Other sounds last for a long time. The note starts and the sound hoooooooooooooooolds out (sing the word holds).
Have the students match your singing voice on one note. On that one note, conduct them singing short and long notes. This is especially effective as you conduct them. A long note might be represented in music by a whole note.
Teacher: Some sounds are fast while other sounds are slow. This is easier to hear when you hear several sounds in a row. We’ll show this one clapping rather than singing. Make your clapping fast. Make your clapping slow. Fast. Slow. Fast.
As necessary, review the characteristics of sounds just taught. Sounds can be:
high/low (pitch or melody)
fast/slow (tempo)
loud/soft (dynamics)
short/long (rhythm or duration)
In the next activity, you will introduce timbre (TAM-bər), which is the characteristic sound (tone, color, or quality) of a voice or instrument.
Note: If desired, the teacher could break this step up and just do high/low and soft/loud in one day, and slow/fast and long/short on the second day. This can make it easier for younger students. However, it depends on how much time the class has to spend on this unit.
Discovering Sounds
Make sure the classroom has plenty of safe noise-making objects around the room. If desired, place objects from home around the room as additional potential sound sources.
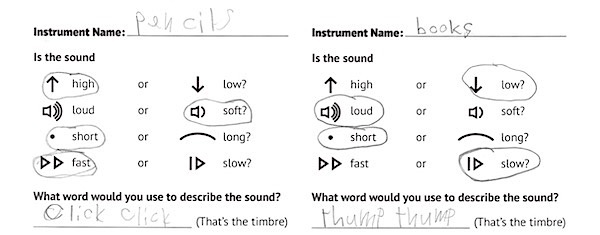
Teacher: At my signal we are going to explore sounds that we might want to use as we create music. As you find objects that make sound, see if you can figure out where the vibrations are happening, just like we did with the first instruments I showed you. You will also pay attention to the characteristics of the sound being created. You will find sounds that fit in each of these categories: high/low, loud/soft, fast/slow, and short/long. You will also decide a word that describes the sound you hear. The unique sound an instrument makes is called timbre (TAM-bər). To describe the sound, we might use words like ring, jingle, or click. I will show a few examples.
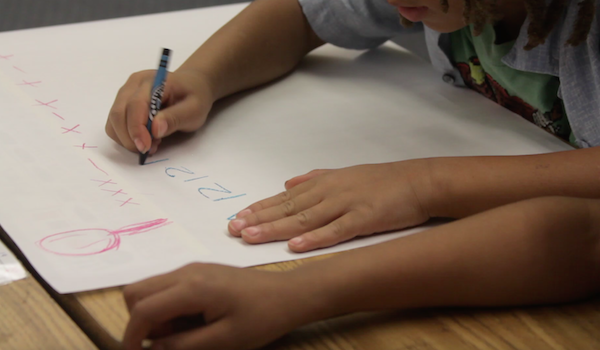
Pick an object or an instrument in the room and have the students listen to what kind of sound it makes. As a whole class, go through each category and decide together if the sound it makes is high/low, loud/soft, fast/slow, and short/long. Decide on a descriptive word together. Hand out Found Sound Classification worksheets. Have students put their names on the worksheet. Fill out the worksheet on the smart board/overhead so students can see the process modeled, then have them fill out the first instrument’s data on their worksheet as you fill it out.
 Have one student pick an object from somewhere around the room. Again, as a class, go through each category and decide together if the sound it makes is high/low, loud/soft, fast/slow, and short/long. Decide on a descriptive word together. Fill out the worksheet on the smart board/overhead so they can see the process, and have them fill out the second instrument on their worksheet with you.
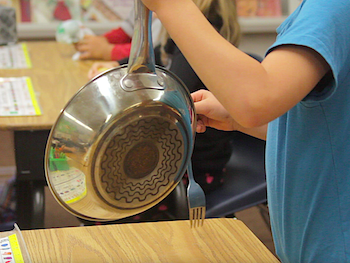
Walk around the room looking for things that might make noise. Tap, jingle, or shake a few items. At each item, pause and ask some questions about the sounds it makes.
Teacher: Does this make a high or low sound? Does the sound last a long time, or does it only last for a little bit of time? All sounds around us can be categorized as is high/low, loud/soft, short/long and can be played fast/slow. You are going to be detectives today. You will get to move around the room and find objects that make noise. After five minutes you will select at least one object to bring back to your desk that isn’t something you would normally think of as a “musical instrument.” If you select a second “instrument,” it can be anything else in the room.
Students have five minutes to experiment with and explore different sounds around the room. At the one-minute warning, they will need to select at least one, but no more than two items to bring to their desk so they can record their data. Remind students they will only be allowed to select one traditional “musical” instrument for their entire process. Students will place all “instruments” in the center of the table for their table members to see, but not play.
Teacher: As a small group, you will now fill out the worksheet for the third “instrument” on your worksheet by choosing one of the instruments you brought back to your table. Choose one instrument to write about together.
Give students ten seconds to decide on an instrument as a table.
Teacher: Circle if the sound made by your instrument is high/low, loud/soft, short/long and if you played it fast/slow. Decide on a word to describe the timbre.
Note: Sometimes students only pick one of the categories to circle. If they do this, you will need to remind them that each instrument should be classified in each category (high/low, loud/soft, short/long, fast/slow, and with a distinct timbre).
Teacher: When I give a signal, your group will choose another instrument that was brought to your table to record the information about.
Depending on the students, this process might require additional time. Differentiate as needed. Students can spend more time to record the data for the additional instruments group members brought back to the table. This could be beneficial for those who need extra exposure, or also for those who work quickly.
Either collect worksheets or have students staple their worksheet into their science journal so they can use this information next time.
Session Two: Classifying Timbres
Note: Students should already be familiar with the song game for Dr. Knickerbocker prior to this activity. If space and time allow, have “instruments” set out in a large circle before starting this session. As students pass instruments later in this activity, it works more advantageously if you create a pattern of four instruments with different timbres when setting up the circle (ring, jingle, click, shake, ring, jingle, click, shake, and so on).
Have students take out their classification worksheets. Help students remember how they classified sounds last time.
 Teacher: What were some of the words you used to describe the sounds you found? Remember, this is known as timbre.
Show the instrument to jog memories and have students look at their classification worksheet to help them remember.
Teacher: Can any of these found instrument sounds be put into similar or “like” groups? (For example, tap and click are similar, shake and swish are similar, ding and bell are similar.)
Write answers on the board.
Teacher: What sounds were mainly classified as high sounds? Low sounds? What sounds were mainly classified as short sounds? Long sounds? What sounds were mainly classified as loud sounds? Soft sounds?
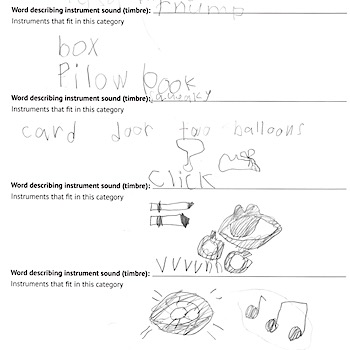
As a class fill out the backside of the worksheet from last time, helping students categorize sounds into five (or less) timbres. Have students draw the instruments that fit in each timbre. If extra guidance is needed, students can classify according to the high/low instruments, loud/soft instruments, or short/long instruments.
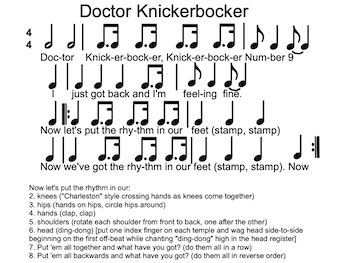
As a class, chant Dr. Knickerbocker through one time with the regular words and motions.
Have students create a sitting circle around the instruments. Either assign students to come to a specific instrument, or allow students to select one instrument to sit behind (so all the instruments are on the inside of the circle, students facing in). One by one, have students play the instrument they are sitting at, and have the class quickly decide which of the timbres you discussed today (ring, jingle, click, shake, and so on) that each instrument fits in, or if it needs to be in a new classification.
Chant Dr. Knickerbocker, but this time say:
Now let’s put the rhythm in the rings [all the instruments that ring play]
Now we’ve got the rhythm in the rings [instruments that ring play again]
Now let’s put the rhythm in the clicks [all the instruments that click play]
Now we’ve got the rhythm in the clicks [instruments that click play again]
Have students play the instrument that matches the timbre word on the two beats at the end of that timbre’s phrase. Play the instruments in order for the last two phrases. Continue with the song until all of the instruments and timbres have been included.
Walk around the inside of the circle counter-clockwise, pointing the direction you are walking, to help students know which direction to pass their instrument.
Teacher: Pass the instrument you have been playing one person to the right. You now should have a different instrument (and perhaps a different timbre) to play during this next time through the song.
Repeat the chant, with students playing the new instrument.
Repeat this process a few more times.
Session Three: Using the Engineering Design Process to Write a Music Composition
Prior to starting this session, make a copy of the Creating a Composition Worksheet for each student. Make sure there are noise making items and, if wanted, a few classroom musical instruments around the room.
Have large paper and marker/crayons/colored pencils ready for students to use.
Teacher: Quickly and quietly select one of the “instruments” we have listened to in the last few days.
Give students 20 seconds to bring an instrument back to their seats, set the instrument in front of them, and place their hands on top of their head to show they are ready.
Teacher: Think about the sounds these “instruments” make.
- Could you change the speed of the sound made by the instrument from fast to slow or slow to fast? How would you change the sound? (Give students 10-15 seconds for sound exploration.)
- Could you change the sound the instrument makes from a low pitch to a high pitch or from a high pitch to a low pitch? How would you change the pitch? (Again, provide 10-15 seconds for sound exploration.)
- If the "instrument" makes a short sound, how might you make the sound last longer? How could you make a long sound shorter? (Provide 10-15 seconds for sound exploration.)
- Is the sound naturally soft or loud? How could you change how loud or soft an instrument sounds? (Provide 10-15 seconds for sound exploration.)
Have students set their instrument under their chair until it is time for them to use them again.
Teacher: People learn and share information through communication. All forms of communication have one thing in common: the sending and receiving of a message. Using different kinds of communication, people can pass along their ideas and feelings to just one person or to millions of people. We often use words to communicate, but music is also used to communicate. Do you think you could solve a communication problem using music? Using only what is in this room, could you create a music composition that will communicate an emotion you are feeling? How could you represent it visually so you remember your composition and can play the same music later, and also so someone else could play your music composition from your graphic notation? To figure all of this out, we’ll use the engineering design process as we write our music compositions.
Show the engineering design process as you explain the composition process to the students.
Teacher: We’ve already figured out the problem: communicating an emotion through music using only the supplies found in this room and recording it so someone else can play the music. Next, we have to imagine all the possible ideas. We want to come up with lots of ideas. We know that some ideas will be good and some won’t work but that doesn't matter. The more ideas you come up with, the more likely you will find a great idea to use. To help come up with ideas, we’ve already been doing lots of research about different sounds that can be made by lots of different objects. Sort through your ideas and see if you have any additional ideas and then select your best idea and develop a plan. You will need to think through and plan out how the music might sound before making any music. To do this, you’ll need to select an emotion to represent, know what instruments you want to use, figure out how the music will sound as it begins, continues in the middle, and ends, and finally, come up with how you want to write your composition down so you can remember it and so someone else can read and play your music. Then you’ll get to create the composition with real materials and test out your composition! As you are testing it out, you’ll need to ask yourself the following questions:
- Do you like how it sounds?
- Can you hear a beginning, middle, and end?
- Does it sound like the emotion you picked?
- Are others able to read and play your composition?
These questions will help you figure out if your plan works. If it does work then you are ready to share it by performing it. And if it doesn't work, you get to try again and make adjustments. Once you feel good about your composition, you will share it with the class.
Teacher: Let’s see how this process works!
Quickly model the entire engineering design process of creating a simple class composition with the students helping make decisions. Go through every step listed in the “Creating a Composition” worksheet together with the students. Display the worksheet on the board for students to see.
 Teacher: First I will decide on one emotion my composition will represent. Let’s look at these faces to get an idea.
Show some emojis and listen to student input to help select one emotion. Draw it in the outline of the face on the worksheet.
Teacher: Next we will need to decide what instruments we want to use that will help communicate that emotion.
Select two or three found sound instruments. Make sure to use your own voice (whistling, humming, or singing without words) and/or your body creating percussive sounds like clapping or stomping to remind students that their own bodies are some of the best instruments in the room.
Teacher: We will draw a simple picture of each of the instruments we selected on the worksheet.
Circle the sounds you want each instrument to make (high, low, loud, soft, long, short, fast, slow, and decide a word to describe the timbre).
Teacher: Now that we have an idea of the instruments and possible sounds, we need to figure out how the music will start, what will happen in the middle, and how the music will end. We do this by thinking of patterns of sound the instruments will play, deciding if instruments play at the same time or separately, and determining the order the instruments will play in. We will need to find a way to draw or write what we do in the music using colors, squiggles, words, pictures, or anything else we can think of to show our song.
Write initial ideas for the composition on the worksheet being shown on the board, then draw a “final” graphic notation on a large sheet of paper (12” x 18” or bigger). Play the 10-15 second composition for the class.
Teacher: Let’s go through our checklist. Did you like how that sounded? Could you hear a beginning, middle, and end? Would it sound better if I added something or took something out? Does it sound like the emotion we picked? Could you read and play this composition?

Listen to student responses, but also give your own opinions of the composition. Make sure to answer “no” on at least one of these questions so students see how they can go back and work through things again.
Teacher: We just experienced together how to create a music composition that will communicate an emotion. Even though our class composition needs some refining, it’s time for you start your own in small groups. It is important to know that every single composition is going to be different. You will each follow the engineering design process, but your final results will be determined by the decisions you make throughout the process.
Hand out the Creating a Composition worksheet for students to use and have students start working in their small groups. Besides “instruments,” have large paper and markers, crayons, and/or colored pencils ready for students to use for their graphic notation when they are ready to create their final music notation.
Monitor student work and side coach as necessary using similar prompts to those modeled as the class created a composition together.
At the end of this session, collect worksheets, or have them attach them in their science journals so students will be able to continue their work next time.
Session Four: Planning, Creating, Testing, Sharing
Before starting this session, make sure groups have their “Creating a Composition” worksheets. Set out the instruments that students selected last time on their desks or tables. Also have large paper and markers, crayons, and/or colored pencils for students to their final music notation.
Review the engineering design process with students.
Teacher: Last time we figured out the problem: communicating an emotion through music using only the supplies found in this room and recording it so someone else can play the music we create. As we work on this project, we imagine lots of possible ideas. We then have to sort through the ideas, select the best idea, and outline a plan of how the music might sound before making any music. We select an emotion to represent, know what instruments to use, figure out how to begin and end the song, and come up with how to show our song in a way that someone else can read and play the music. We should all be creating our compositions today and testing out the plans developed! While testing, each group should ask the following questions:
- Do we like how it sounds?
- Can we hear a beginning, middle, and end?
- Does it sound like the emotion we picked?
- Are others able to read and play our composition?
Give students time to create their compositions.
 Throughout their time working, remind students to figure out patterns of sound the instruments will play, if instruments play at the same time or separately, and the order the instruments will play in.
Additional side coaching comments could include: What does the beginning of your song sound like? How will I know it is the end of your song?
Once students have answered yes to each of the questions and feel good about their composition and notation, they should practice playing through their song several times so they are ready to share it with the class.
Have groups show the class their music “notation” and then perform their compositions.
Performances might take an additional day depending on class size.
Assessment:
Are students able to categorize sounds as high/low? Loud/soft? Short/Long?
Are students able to come up with descriptive words to describe an instrument’s timbre?
Are students able to create an original composition that communicates an emotion?
Are students able to represent through graphic notation their original composition?
Extensions:
Explore how sound doesn’t just come from vibrations but also creates vibrations. Hold a paper in front of a speaker or place an object near a tuning fork and observe what happens.
Categorize instruments in categories other than timbre.
- Materials instruments are made from
- Wood
- Metal
- Plastic
- The way the instrument makes sound
- Aerophone, vibrating air
- Chordophone, vibrating strings
- Membranophone, vibrating membrane
- Idiophone, vibration of the instrument itself
- Combination of vibrating materials
- Instrument Families
- Strings
- Woodwinds
- Brass
- Percussion
- Keyboards
Learning Objectives
- Analyze sounds made in the classroom
- Categorize sounds according to high/low, loud/soft, short/long, fast/slow, and by various timbres.
- Compose an original composition using sounds discovered around the classroom.
- Communicate an emotion through sound.
Utah State Board of Education Standards
This lesson can be used to meet standards in many grades and subject areas. We will highlight one grade’s standards to give an example of application.
Grade 1 Music
- Standard 1.M.CR.2: Demonstrate and discuss personal reasons for choosing favorite musical ideas.
- Standard 1.M.CR.3: Organize personal musical ideas using iconic notation or recordings.
- Standard 1.M.P.2: Explore the effects of various timbres, dynamic levels and tempos, using voice, movement, and simple instruments.
- Standard 1, M.R.2: Describe feelings conveyed by a music selection, identify elements in a music selection that elicit feelings, show feelings conveyed by music through movement, and predict the use of a music selection.
- Standard 1.M.CO.1: Describe how music relates to personal experience, use life experience and additional content knowledge to inspire and respond to music, and deepen understanding of another content area through music.
Grade 1 Science with Engineering Education (SEEd)
- Standard 1.3.1: Plan and carry out an investigation to show the cause and effect relationship between sound and vibrating matter. Emphasize that vibrating matter can make sound and that sound can make matter vibrate. (PS4.A)
- Standard 1.3.4: Design a device in which the structure of the device uses light or sound to solve the problem of communicating over a distance. Define the problem by asking questions and gathering information, convey designs through sketches, drawings, or physical models, and compare and test designs. Examples of devices could include a light source to send signals, paper-cup-and-string telephones, or a pattern of drum beats. (PS4.C, ETS1.A, ETS1.B, ETS1.C)
Equipment and Materials Needed
- Objects in the classroom that make noise
- Miscellaneous small objects from home (kitchen items, tools, and so on) that make unique sounds
- Various classroom musical instruments
- Dr. Knickerbocker sheet music (optional)
- Emoticons chart
- Large paper for musical score
- Colored markers or crayons
- Found Sound Classification worksheet
- Found Sound Composition worksheet
- Pencils
Additional Resources
- Video of Dr. Knickerbocker sung instead of chanted
- Different sheet music for Dr. Knickerbocker (to sing)
- Utah Open Education Resources SEEd Textbooks
- Music Outside the Lines: Ideas for Composing in K-12 Music Classrooms by Maud Hickey
- FOSS Sound and Light Module (https://www.fossweb.com/module-summary?dDocName=G3834699)
- Instruments can be classified according to their vibrating material with an example given.
- Aerophone: vibrating air (flute)
- Chordophone: vibrating strings (guitar)
- Membranophone: vibrating membrane (bongo drums)
- Idiophone: vibrator and resonator are the same (triangle)
- Combination of vibrating materials (kazoo, voice)
- https://www.savvyhomemade.com/homemade-musical-instruments-kids/
- BetterLesson.com, Michele Beitel, Unit 1: Sound Waves
Image References
Images 1-2: Jeff Cornwall
Images 3-5: Emily Soderborg
Image 6: https://education.byu.edu/sites/default/files/media/arts_lesson_plan/files/2023/Emoticons.pdf
Image 7: Emily Soderborg
Image 8: Jeff Cornwall
www.education.byu.edu/arts/lessons