All Art Lessons
SUBJECTS
GRADE
Show Results
Let's Face It: Drawing the Face Is Fun
Lesson Summary
- Examine and respond to various self-portraits.
- Create and share self-portraits that communicate personal interests.
Lesson Plan and Procedure
Lesson Key Facts
- Grade(s): 4, 5, 6
- Subject(s): English Language Arts, Math, Visual Arts
- Duration of lesson: Two to four sessions, 35-40 minutes each
- Author(s): Cindy Clark
 Download
Introduction
Have the students draw the worst face they can.
Teacher: You have 10 minutes. You can use markers, crayons, or whatever else is on your table. Think worst! Ugly! Stupid! Horrible! Think of all those negative words that you sometimes express about your drawings.
Have the students draw the faces.
Teacher: Look at your pictures. What do you notice that is interesting? (Use the term interesting when looking at art.)
Activity 1: Contour Line Drawings Are a Good Place to Start
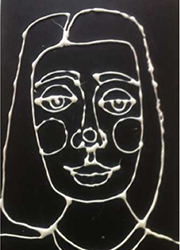
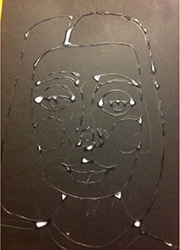
Have the students draw their face using glue and contour lines on black paper. Let the glue dry. Then use chalk pastels to add color. Make it interesting!
Teacher: What does your portrait say about you? Did you use your favorite colors? (See samples below.)

Activity 2: Proportions of the Ideal Face
Examine ideal proportions of the human face. With lower grades, use an oval template; with upper grades, have students draw an oval to start.
The following steps will help students recognize techniques for and find more success in drawing the proportions of the face.
- Draw an oval—the ideal face shape.
- Draw eyes. (The ideal face is five-eyes wide, with one eye-width between the eyes.) The eyes are half the distance from the top of the head to the bottom of the chin.
- Draw in the eyebrows.
- Draw the nose. (The nose is about one eye-width wide.) The end of the nose is half the distance from the brows to the chin.
- Draw lips. (The width of the mouth is in line with the pupils of the eyes.) The line between the lips is a third the distance from the bottom of the nose to the chin.
- Draw ears. The ears line up with the brow line and the bottom of the nose.
Invite students to add details to make this portrait reflect their own face. Hint: Remember the hair comes down a little bit on the forehead. It doesn’t sit on top of the head.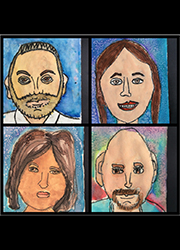
The following are students' portraits of someone who influenced them, done in various media. Students outlined their portraits with black oil pastel, and then they practiced watercolor techniques of wet-on-wet, salt, resist, and color-mixing.
In addition to creating the portraits, invite students to write a paper about the person, describing the person physically and how this person was influential to them.
Possible Rubric for Self-Critique
Allow students to critique their own learning and artwork. Here are some examples: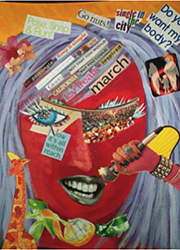
- I can identify portraits and self-portraits among other artworks.
- I can tell the difference between portraits and self-portraits when given the background information.
- I can point out examples where artists communicate something about themselves and/or their culture in their artwork.
- I chose materials I thought would work best for my self-portrait. I can explain why I chose them.
- I created a self-portrait that communicates something about me. I can explain it.
- I presented my artwork to the class and received feedback. I also provided feedback for my peers about their work.
- I examined student-created self-portraits made by my peers and identified similarities.
- I helped group the portraits based on similarities and explained reasons for our grouping.
- Overall, I feel like my self-portrait is successful because. . . .
- If I were to do this project again, I would do these things differently. . . .
Learning Objectives
- Generate an artistic work by creating, refining, and evaluating.
- Evaluate how artistic work conveys meaning.
- Relate artistic work for personal meaning and external context.
- Create a self-portrait and write an opinion piece.
- Write informational/expository text to convey complex ideas. Create a portrait of a person who represents various ideas (for example, a portrait of a president or scientist).
- Write a narrative to develop real or imaginary events. Create a portrait of a real or imaginary character.
- Make sense of shape and space. Use shape and space to create a portrait.
- Describe and compare measurable attributes. Compare parts of the human face/its proportions.
- Measure lengths indirectly, as related to proportions of the face.
Utah State Board of Education Standards
This lesson can be used to meet standards in many grades and subject areas. We will highlight one grade’s standards to give an example of application.
Grade 5 English Language Arts
- Writing Standard 1: Write opinion pieces on topics or texts, supporting a point of view with reasons and information.
- Writing Standard 2: Write informative/explanatory texts to examine a topic and convey ideas and information clearly.
- Writing Standard 3: Write narratives to develop real or imagined experiences or events using effective technique, descriptive details, and clear event sequences.
Grade 3 Math
- Standard 3.MD.4: Generate measurement data by measuring lengths using rulers marked with halves and fourths of an inch. Show the data by making a line plot where the horizontal scale is marked off in appropriate units-whole numbers, halves, or quarters.
- Standard 3.G.1: Understand that shapes in different categories (for example, rhombuses, rectangles, and others) may share attributes (for example, having four sides), and that the shared attributes can define a larger category (for example, quadrilaterals). Recognize rhombuses, rectangles, and squares as examples of quadrilaterals, and draw examples of quadrilaterals that do not belong to any of these subcategories.
- Standard 3.G.2: Partition shapes into parts with equal areas. Express the area of each part as a unit fraction of the whole. For example, partition a shape into four parts with equal area, and describe the area of each part as 1/4 of the area of the shape.
Equipment and Materials Needed
- Markers, crayons, or other drawing utensils
- Glue
- Black paper
- Chalk pastels
- Oval template (for younger grades)
- Black oil pastels
- Watercolor paint
- Salt
- Crayons
Additional Resources

Key Vocabulary
Analysis, art, collaborate, communicate, compare/contrast, context, creative process, culture, details, grouping, materials, interpret, portrait, self-portrait.
Possible Accommodations
Invite students to do the following:
- Present their artwork both visually and verbally.
- Modify tools and materials for various learners.
- Adjust timelines, adding extra time as needed.
- Provide different means of communication.
- Explore subtopics or issues.
Additional Lesson Resources
Look to Picasso. As a child, Picasso painted like an adult. As an adult, he wanted to paint like a child. Look at the evolution of self-portraits by Picasso. As a child, Picasso had a photographic memory and could paint realistic details. His father actually gave him his own paints because of his ability. However, Picasso didn’t want to paint portraits like a photograph; he wanted to make his paintings interesting.

Another great resource for this lesson plan is the book Just Like Me: Stories and Self-Portraits by Fourteen Artists, edited by Harriet Rohm.
Image References
Images 1: Mark Philbrick.
Images 2–6: Cindy Clark.
Image 7: Pinterest (https://www.pinterest.com/pin/527554543822688869).
Image 8: Just Like Me, edited by Harriet Rohmer (https://www.amazon.com/Just-Like-Me-Self-Portraits-Fourteen/dp/0516209388).
www.education.byu.edu/arts/lessons